29 Jul Food wall art with the Hembakat cookbook
I picked up the cookbook as a small gift for my wife, Clementine on a whim on an IKEA run, after she had previously pointed it out as “just way too adorable.” When I gave it to her, she pondered it for a few seconds and then started to rip the binding apart. Once I regained consciousness, she explained that we were going to turn it into beautiful wall art. The idea simply came to her. By the end of the weekend, with maybe 4-5 hours of total work, it was up on our walls, providing a vibrant pop to our home.
IKEA items used:

1 HEMBAKAT cookbook
6 FISKBO frames – 50cm x 70cm, white
Other materials tools:
A paper cutter for clean, measured cuts of individual pages
A utility knife for sizing the backdrop to the frame backing
Any reasonably sturdy all white paper for a backdrop
Double-sided tape to adhere pages to the backdrop
Cook up wall art with the HEMBAKAT
Carefully remove all pages in the book from its binding and cover. Do not rush this, as you may wind up tearing through a whole swath of pages, and keeping as many pages intact as possible is key to the rest of the process. The pages are bound together into sections of 20 or so pages with string which is adhered to the cover. Gradually pull the full collection pages from the cover until it is neatly separated, using scissors to snip the strings from the cover. Then, with scissors, begin to cut the string to separate the individual page sections.
Carefully isolate each page. Lay each page section flat facing downward, i.e. so that the fold in the middle is pointed upward. Gently, from top to bottom, pull each double page off of the loosely connected stack. In doing so, it will become easy to cut through the small connections of the double page to separate them into singular pages. Repeat this for each double page on each page section until all pages are isolated.
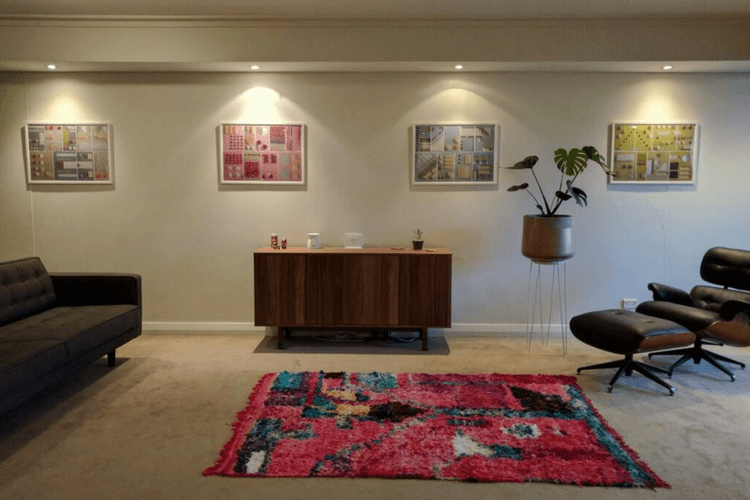
Decide on an arrangement of your choosing and organize! We knew we wanted to make 6 frames (which is about the max for frames of the size we chose, though we did have a half-dozen or so non-matching pages left over), 2 of which featured the neutral-toned baked goods and 4 of which featured color-coordinated ingredient spreads.
Related: How to make your own Swedish meatballs


Keeping in mind that the backs of colored pages were neutral-toned and vice versa, we first identified those baked goods and ingredient spreads that looked like ones we wanted to display, so as not to wind up wanting to display items that were two sides of the same page. We then arranged the colored pages in a rainbow on the floor to better visualize the blocks of color available and then separated them into blocks which would be appealing and filling enough for a single frame. See pictures of our wall art arrangements on the ground for a better sense of what we were going for.


Related: Using ALGOT frames for thread wall art. See the tutorial.
With 6 frames’ worth of pages identified, decide on how each frame will be laid out. Each FISKBO frame has a thin cardboard backing whose surface area is equal to the visible surface area once framed, assuming no window mat. This makes it straight-forward to determine an arrangement: lay the cardboard backing flat, place the uncut pages on the backing however you like as a test run, and determine where cuts need to be made. It is recommended to do this test run exercise on each frame before doing any actual cuts, as you will likely find that each frame will have similar cutting needs and making sure all frames are ready before cutting will avoid an annoyingly costly mistake.

Make the actual cuts of the pages to get everything sized for the frame’s layout. In our case, we knew we wanted a clean grid of rectangular shots with small, equidistant horizontal and vertical spacing between individual pages. After toying with different ideas, we decided to go with two rows of 3-4 pictures each per frame. Because two pages vertically was slightly too large for the frame, we knew we’d need to vertically cut some of the pages, so we settled on ensuring the top row of each frame was slightly shorter than the bottom. We also cut each page by varying amounts horizontally, for some aesthetic diversity.


For each frame, optionally apply a better backdrop. The thin cardboard backing with the FISKBO may work for you, and you may opt to completely cover it. But we wanted a thin white gap between all pages in our grids, so we used some not-too-thin, not-too-thick poster paper in white matte. To avoid slicing into the cardboard backing, we took the plastic “glass” of the frame, laid it flat (with its thin covering still protecting it) atop a healthy piece of the poster paper, and used a utility knife to carefully trace around the “glass” and create poster paper rectangles perfectly sized to the frame. There should be no need to actually adhere this to the backdrop. It’s all going to be pressed together when the frame is sealed.
Carefully assemble the layout of each frame. With the cardboard backing down flat and the precisely cut paper backdrop atop, adhere your cut pages to the backdrop as desired. There are surely better adhesion methodologies for this, but we wanted something cheap and easy, so we used thin double-sided tape. We have had these up on the wall for a year with nothing falling down and know sides starting to curl upward. Generally, we used six pieces of tape along the sides of each page. Take your time no matter your methodology. Depending on what you choose, you may not easily get a second change to adjust the page’s location or orientation.
Finish each frame! Remove the thin covering protecting the glass of the frame and place it atop your pages. Slide the frame atop and around the glass until it is snugly in place, and then flip the entire thing over to expose the back. Push the metal tabs down to seal the backing to the frame, et voila! It’s done!
Mount however you’d like. The FISKBO has a simple mount on the back that is lightweight enough to be held with a single nail, screw, etc. while laying more or less flat to the wall.

Including the frames and the book, our wall art cost $88 total. We had the few other materials and tools required already on hand.
Our favorite part of the hack was the layout design phase (see step 3 above). Having all of these gorgeously photographed, vibrant little pieces of art to work with really stimulated our creativity.
Related: How to make wall art standout mounts for KORT art cards.
The hardest part of the hack was then taking those layouts and getting all of the pages cut just so to ensure that both a) each individual frame had a neat and linear grid, and b) all frames were consistent enough to one another. Having a paper cutter with guides that can be set is a lifesaver here, because if each frame has the same size requirements, you can ensure consistent cuts across all pages.

In the year since we created the wall art, they have been a consistent conversation piece. New guests are immediately attracted to the combination of Scandinavian, severe geometry and delectable looking baked goods (which is a fairly good representation of our own personalities). We, of course, love to then humble brag that we made them ourselves for less than $90.
~ by Clementine Jacoby and Joshua Essex
The post Food wall art with the Hembakat cookbook appeared first on IKEA Hackers.
Read more: ikeahackers.net