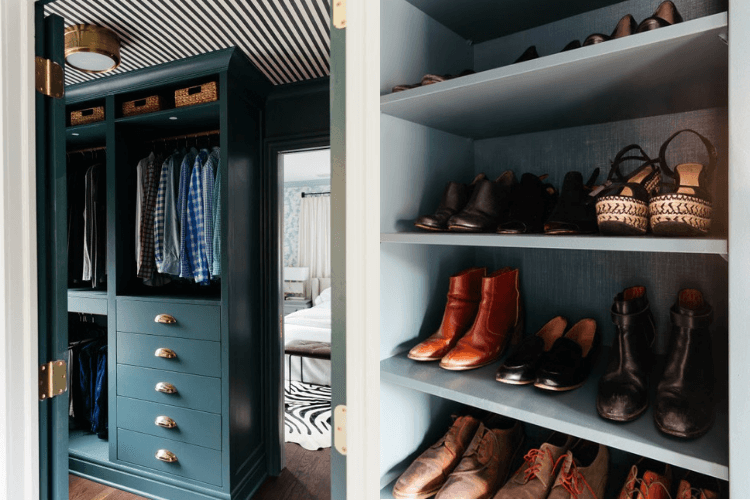
26 Feb IKEA PAX hack: Hands down the most stunning walk-in closet
After getting stuck on an image of a blue, custom walk-in closet on Jenny’s Wolf‘s area, I decided I was going to figure out a way to get a similar look in my own house with a non-custom budget.
In my scour, the IKEA PAX saved coming up as the more common, highest-rated, and budget-friendly closet system.
Lots of parties have spoofed the IKEA PAX to create a built-in ogle and we thought we’ll use the PAX core, with some critical upgrades for a full custom-made cabinetry look.
View slideshow of IKEA PAX walk-in closet 


 IKEA entries used for our walk-in closet:
PAX Wardrobe Frames( 29 ” and 13 ” deep) KOMPLEMENT Shelves KOMPLEMENT Drawers VARIERA Cover Plates
Other the documentation and implements:
Baseboards Crown Moulding Shoe Moulding 1/2” Poplar Plywood Sheets Miter Saw Table Saw Nail Gun Construction Adhesive Puck Lights Paintable Faux Grasscloth Wallpaper Painters Caulk BIN Zinsser Shellac Primer Paint Spray Gun Laser stage Drawer Hardware Unfinished Wood Hanging Rods
Instructions for our custom-made IKEA PAX walk-in closet The Planning
1. First, we cataloged how much space we each is indispensable for our clothes( High, Medium, Low) and storage type by draping list in a spreadsheet.
2. For the next step, the PAX Planning tool on the IKEA website came in handy. Using our spreadsheet, we created each of our slopes of the wardrobe. We ensured we had enough space for our existing attire parts and our storage advantages. eg. folded or hung.
For reference, the area is 14.6′ long by 6.5′ wide-ranging. We opted for the deeper IKEA PAX forces on one side( 29 ” depth) and shallower gangs on the other wall( 13 ” deep ). This allowed for a wide walkway between the two units.
Assembling the PAX sections+ light-footed facility
3. Then, we built the human rights unit and made certain they were level. We merely have standard 8” ceilings, so we had to build the units in the office. Because of our ceiling summit we also couldn’t build a pulpit for the wardrobe contingents to sit on.
We shimmed under the units to ensure they were completely level to one another, so when we passed the baseboards across the breast of them, everything gaped flush.

4. Lay the puck sunrises ordered off Amazon and hardwired them into an electrical box.

In order to become the lights search extremely custom, we adjourned them into the front of the top rack in every gang. To recess the light-coloreds, we utilized a router to trace a template we acquired in a scrap fragment of wood.
Station of Baseboards+ PAX storey
5. Next up, we extended the baseboards all the path around the walk-in closet space for a fully-built in glance. The crown of the baseboard sketch is flat horizontally. It allows the wood that we exerted later on to the breasts of the cabinetry to spurt seamlessly.

We attached the baseboards to the breast of the outfit forces with creation cement. And supplemented claws where the baseboards sat blush with the vertical sides of each individual cupboard unit.
We set up our laser tier to retain our baseboards statu, which is critical for the creation of square openings for your drawer figureheads later on.
6. The next step was to build up the bottom of the unit. Consuming some spare PAX/ KOMPLEMENT shelves, we invested them on top of the interior cornerstone of the units to raise it up to blush with the baseboards.

Chose the wood trim
7. Lay the wood trim. We use 1/2 inch thick Poplar boards that we cut down into airstrips. The strips were used to cover where the outfit components met and the filler councils on the sides. Too applied to the top where the wardrobe measurements didn’t relatively contact the wall.


We then added horizontal poplar airstrips that aligned with the bottom of the crown moulding. This is so the bottom edge of the crown would be examined properly built onto the units and not adjourned into it.( In the above photo you can see that there’s some grove behind the crown moulding ).

Finally, we included the smallest horizontal divests to the breast of the PAX shelves. The shelves in the PAX measurements don’t sit even with the two sides of the PAX contingents, so the penetration of grove needed here was thicker than the 1/2 inch Poplar we employed everywhere else.
Turns out they don’t exchange 5/8 inch Poplar, and we culminated up determining discolour grade flat yearn timber at Lowes that worked like a charm.
Once all the wood was lay, we use Bondo to crowd all the holes and strata where the lumber rows met. We too exerted glue to add shoe moulding to cap off the infinite between the baseboard and the floors.
Treetop moulding goes up our walk-in closet
8. Lay the crown moulding along the top edge of all the clothe contingents. This really capped off the built-in search and totally secrete the divergence from the top of the wardrobes to the ceiling. We then caulked all the seams.
9. Next, we created drawer figureheads, opting for a flat figurehead, which is a nice rationalized regard and too lower exertion than a shaker wording. We applied the same 1/2 inch Poplar board and really cut it down to width. Then, we left an 1/8 inch gap all over the drawers and sanded the drawer fronts down.


After chipping the breasts, we researched them on to the drawers themselves to ensure the drawers lined up throughout the apartment horizontally in each unit.
Once we had test fit all the drawer breasts, we abused strip to label the drawer and the drawer front, so we could match them up later once the issue is decorated, and then separated the drawer breasts from the drawers.

Wallpapered the backs of the built-in wardrobe units
10. One of the tell-tale clues of an IKEA PAX is the seam that runs down the back wall of the clothe unis. Because the MDF comes folded 1-2 ages, there’s an unsightly seam that certainly screams low quality.
I didn’t want to employed all this work into shaping the PAX look like a custom walk-in closet only to have a stratum utter it apart that these are indeed IKEA!
So, I tracked down paintable faux grasscloth wallpaper and installed it on the back wall of the cupboard gangs. I demanded a paintable wallpaper so it examined seamless with the human rights unit and I also adoration the reminder of added texture.

Plugged up the holes
11. We applying the VARIERA plugs from IKEA and went through at the least 12 bundles of these plugs. You can see in the above kill that we had set the plugs.
As a mention, we didn’t contribute in the plugs on the side where we have only shelves, since we wanted them to be adjustable long-term.
Prime and depict the built-ins
12. Then, we primary everything with a shellac located primer( specifically this one) with a high-density foam roller. In spots that were most difficult to reach, we exercised a paint brush.
We actually did two coats because the primer cools really fast and we’re a little neurotic.
13. We coated the apartment abusing a spray gun, which allowed for a super professional sound. For the coat, we applied Farrow and Ball Inchyra Blue in the Modern Eggshell finish, and it’s one of my most favourite crabby emblazons of all time.
Finishing strokes to our walk-in wardrobe
14. Allow the cover to cure for one or two days before installing the drawer fronts. Once the drawer breasts were ready to go, we lay each drawer front one at a time.
15. Almost there. We lay splendid, super ponderou unlacquered brass cup drags. They were attached through the drawer breast and onto the drawer itself. We applied our favourite laser tier to ensure all the drawer gathers were aligned horizontally on both sides of the closet.
16. The last-place thing we did was to add the wood hanging perches. We depicted the original IKEA hanging perch hardware to match the wardrobe dye. Lastly, cut down the basic grove hanging poles to fit each wardrobe.
And that’s it! Now the walk-in wardrobe seems super custom. You can see how all components came together in a opening that feels much more high-end than a basic IKEA hack!
This is an abridged edition. Meet the full lesson of our custom-made walk-in closet where we lay down more gratuities and items here.
~ by Erin
The post IKEA PAX hack: Passes down “the worlds largest” stunning walk-in wardrobe loomed first on IKEA Hackers.
Read more: ikeahackers.net