09 Aug Two-Way Modern Antique Writing Desk
I had this very old antique writing desk (which I had gotten for free) that I wanted to modernize and use as my current writing desk. It used to occupy my foyer, but I needed a desk that was comfortable to work at, and that would fit the aesthetic of my space. (It will be in my bedroom, which has White-Stained Oak Veneer MALM dresser/night table, and a black bookshelf, and plain black-framed wall art).

IKEA items used:
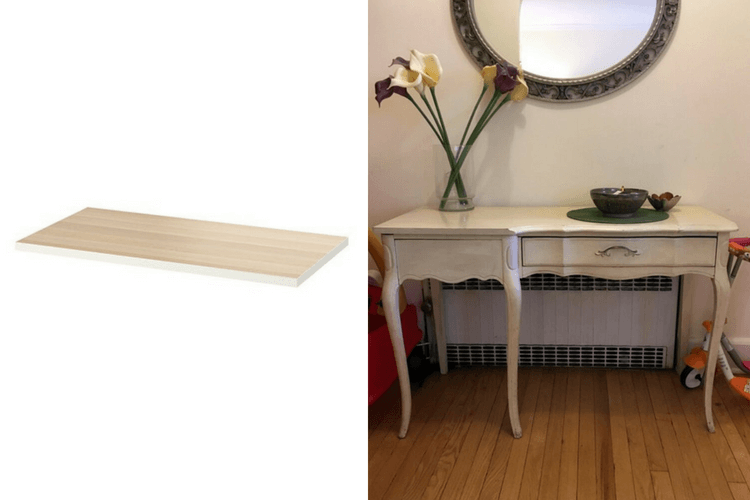
LINNMON Table top, white, white stained oak effect (AS IS Section $10)
MOSSLANDA Picture ledge, black ($6.99)
$2 solid wood board from AS IS section
Cable Clips from FIXA Chord Management Kit
Keyhole drawer pull from free “Spare parts” section at IKEA

LINNMON | IKEA.com
Other materials:
Black Paint
Foam brush
Screws
1” shelf brackets
Glue gun
How I modernized my antique writing desk
1. First, I painted the entire desk with easy use semi-gloss black paint I had picked up at Walmart. I wasn’t yet fully committed to this project, so I didn’t want to spend too much on paint.
It turns out, that this paint (Waverly High performance Semi-Gloss acrylic in the color “Ink) has excellent coverage, applies easily, and dries with a nice sheen. Any visible strokes look like wood grain, so I didn’t feel a need to sand it.
2. I wanted a light wooden top to modernize the look, and brighten the space. Replacing the desktop would have the added benefit of minimizing some the antique-y curves of the original desk.
Since the other furniture in my room is white stained oak (MALM), I wanted this to match that color. I didn’t really want to spend $30 on the LINNMON, since the white on the edge wouldn’t work well. And since it was only laminate and I could buy a SOLID piece of wood for around that much, and stain it. However, when I saw this exact piece in the IKEA “Handyman Corner” for $10, I snatched it up.
3. The color on the table top was good, but the white edging was NOT. So I took out my paint again and painted the edges black. I then removed the old desktop, and the whole project suddenly came together.
I will likely need to redo the edges, since I didn’t do any prep on the laminate, so it chips easily. (But applying iron-on wood veneer trim, and then painting THAT might be easier and less costly than priming and prepping the laminate to paint. For now, it’s okay as it is.)

4. When trying to decide exactly how to position the desktop before attaching it, I found that I really liked being able to slide it forward and back. There are about 4.5” of extra overhang and this is really convenient for working from either side of the desk and for when I need to get closer to the desk, but my giant chair doesn’t allow (or if I’m just too lazy to roll my chair on the carpet).


I attached 8 FIXA cable clips to the underside of the desk (using a glue gun) to function as stoppers to prevent the desktop from sliding too far in either direction. (I’m not using these as cable holds right now, but I figure they may have utility in the future).
I positioned these flush against the right and left sides of the desk to prevent it from sliding in those directions, but the desk top easily slides forward and back into perfect position.
When doing this, it was important to make sure the desk top was VERY straight when pulled or pushed in either direction before attaching the stoppers, as this will determine how straight the desktop lays. In the future, it may be even better to make an underframe to allow this function to be even more secure, but this is the easiest, cheapest option for now.


5. I then replaced the old-fashioned drawer pull with a keyhole pull I found in the IKEA spare parts section for free, and voilà!

I THOUGHT I was finished here…
BUT…
6. This writing desk ended up about 4 inches taller than my older desk (partially because it’s just taller, and partially because the Linnmon was thicker than the older tabletop).
I’m not tall, so when I raised my chair high enough for ergonomic comfort for typing, my knees hit the bottom of the desk. So… I decided to remove the drawer (sadly, because I loved the drawer pull).


6. Without I drawer, I now had no place to stash any desk items (Or my laptop, which is less used than my tablet). So… I added a MOSSLANDA picture ledge under the desk (across from my legs) for some hidden storage which can be easily reached. I added a hidden shelf under the left side of the desk with 1” shelf brackets.
The shelf is a $2 piece of wood I found in the as-is section. I put a wire shelf on the hidden shelf to function as hidden cord management (I attached a power strip under the desk), and still allow the laptop to slide in easily beneath that. I had to cut the wire shelf to size (I used a glue gun to help refinish the edges).

The project took me several days and many hours to complete, mainly because I wasn’t totally sure of my vision from the beginning, and because of the unexpected drawer issue. The ACTUAL project is a simple one, and could probably be completed in about 3 hours (including paint drying time).
~ Ian Chesner
The post Two-Way Modern Antique Writing Desk appeared first on IKEA Hackers.
Read more: ikeahackers.net